4-Hen Starter Coop, free plan
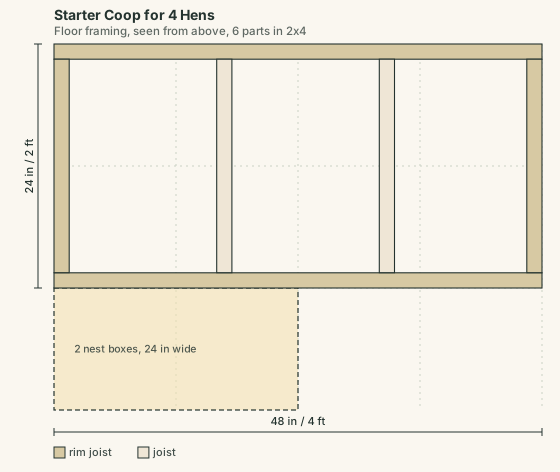
The Starter Coop is a small ground coop fixed at 4 hens, built to try the plan format before buying a paid, flock-sized build. It includes an outside-access nest box and a roost bar sized for 4 birds.
The download is the same format as every paid plan: a start-here page with dimensioned views, a cut list packed onto 8, 10 and 12 ft stock lumber, a panel layout for the sheathing, a generated assembly order, a bill of materials in JSON, and a floor plan SVG.
If your flock is bigger than 4 hens, the free Coop Size Planner shows the floor space, run space and roost length you actually need, and points to the paid plan sized for it: Raised Coop, A-Frame Tractor or a walk-in coop.
Framing spacing and fastener counts are this engine's own conservative rules, not a building code requirement; the plan says so on its start-here page. No physical prototype of this coop has been built as part of making this plan.
What the free download contains
- A start-here page with dimensioned views of the coop, the nest box and the roost
- A cut list with finished lengths, packed onto stock lumber
- A panel layout for sheet goods on standard 4x8 sheets
- A hardware list, including hardware cloth quantities and fastener sizes
- An assembly order with the checks that belong at each stage
A sensible first build
Four hens is the size most people start with and the size most municipalities allow without special permission. A ground coop at this scale is a weekend build for someone who has used a circular saw before, and it teaches the two skills the larger plans assume: framing a square panel, and fitting hardware cloth so the edges are captured rather than stapled on the surface.
Predator proofing is not optional
The most common loss is not a fox through a wall, it is a raccoon through a latch or a weasel through chicken wire. Three details do most of the work: half inch hardware cloth instead of chicken wire on every opening, two step latches that a paw cannot work, and a buried or aproned skirt of hardware cloth extending outward at ground level so nothing digs under the edge. The plans call for hardware cloth throughout for exactly this reason.
When to move up a plan
If you already know the flock will reach six or eight birds, build the raised coop instead. Extending a coop sized for four is rarely worth the work: the roost, the nest boxes and the ventilation all have to grow together, and by the time you have done that you have rebuilt the coop around the old floor.
Build procedure that keeps the small coop square
Print the cut list and mark every board before cutting. Use one tape measure for the whole job, because two tapes can differ by 1 or 2 mm over a short span. Cut framing first, then stack parts by wall, roof, floor, door and nest box. Leave sheet goods uncut until the framed openings are checked, because a frame that is 3 mm out of square can change the real panel fit.
Build each rectangular frame on a flat surface. Measure both diagonals before fastening the second corner hard. For a small coop panel, keep the two diagonals within 3 mm of each other. If the difference is larger, pull the long diagonal shorter with a clamp or a temporary brace, then fasten the sheathing while the frame is still square. The sheathing acts as a brace once it is fixed.
Fit the floor and two long walls first, then add the short walls. Check that the floor edge is not crowned upward before the walls are locked in. A 6 ft level is useful, but a straight 8 ft board checked against a string line is good enough. Set the roof framing after the box is square, not before. Fit doors last, with a visible gap all around so swelling does not jam the opening after rain.
Plan one full day for cutting and framing, and a second day for hardware cloth, doors, latch fitting and roof closure. Hardware cloth usually takes longer than new builders expect. Cutting, folding and capturing sharp edges can take 2 to 4 hours on a coop this size.
Tools, setup space and working tolerances
You do not need shop equipment, but you do need a stable cutting setup. Two sawhorses, a straight guide board and a circular saw are enough if the stock is clamped. A drill driver, impact driver, tape, speed square, clamps, tin snips, staple gun for temporary holding, gloves and eye protection should be on the bench before work starts.
| Item to check | Practical target | Why it matters |
|---|---|---|
| Panel diagonal match | Within 3 mm | Keeps doors and roof edges from twisting. |
| Door clearance | 3 mm to 6 mm on each free edge | Allows for paint, bedding dust and seasonal swelling. |
| Hardware cloth overlap | At least 25 mm past the opening frame | Gives enough edge to capture under trim or battens. |
| Ground apron width | 300 mm to 450 mm outward from the wall line | Stops most digging at the base without a deep trench. |
| Vent opening height | Above roost level where possible | Lets damp air leave without blowing directly on birds. |
Use exterior rated fasteners where rain can reach them. If you prepaint parts, keep paint off glue faces and latch bearing faces. Label the inside face of each panel before paint, because small coop panels can look interchangeable until the nest opening or door swing is needed.
Frequent mistakes and recovery steps
- If a wall panel is racked, do not force it into the coop body. Remove a few fasteners from one corner, clamp the panel square, then add the sheathing or a temporary diagonal brace before reinstalling it.
- If a door rubs at the latch side, check the hinge side first. A thin shim behind the lower hinge often raises the latch corner by 2 mm to 4 mm without recutting the door.
- If hardware cloth was cut too small, do not bridge the gap with staples alone. Add a framed batten that captures both the old edge and a new patch with at least 25 mm overlap.
- If the roof panel overhang is uneven, measure from the wall frame, not from the sheet edge. Trim the visible edge only after the roof is fixed and square to the coop body.
- If the coop rocks on the ground, level the base with pavers or compacted gravel under bearing points. Do not twist the framed body down to meet an uneven surface.
The most expensive error is closing the coop before testing daily access. Before final trim, open the nest lid, main cleanout, pop door and any feed access in sequence. Your hand should reach every latch without scraping hardware cloth. If the access path feels awkward during the build, it will be worse in wet weather with gloves on.
Special cases to decide before cutting
If the coop will sit on clay soil, raise the bearing points slightly above grade and slope the surrounding soil away by about 20 mm per 300 mm. Clay holds water against wood and makes the apron harder to keep flat. On sandy soil, pin the apron more often and cover it with soil, gravel or turf so wind and scratching do not lift an edge.
For snow country, keep the cleanout side reachable after a storm. A small ground coop can become difficult to service if the door opens toward the drift side of a fence or shed. For hot climates, give shade priority over wind blockage, but keep openings screened with hardware cloth. More opening area helps heat leave, but it does not replace secure mesh and solid latches.
If children will collect eggs, set the nest access so the lid cannot fall onto fingers. A simple prop stick works only if it is always used. A safer layout is one where the lid rests fully open against a stop and the latch can be worked with one hand.
If the flock may grow, do not stretch this build during construction. Finish it as a four hen unit, then use the sizing method on the plans page to choose a larger layout. For questions about plan files, printing and measurements, check the FAQ before cutting a second set of parts.
Read next
- Raised Coop + Run Bundle: Raised coop and attached run bundled in one cut list, for 2 to 8 hens.
- Attached Run Add-On Plan: Attached run plan for 2 to 20 hens, framed to join an existing coop.
- Walk-In Coop Plan, 8x8 ft: Walk-in chicken coop plan, 8x8 ft footprint, for 6 to 20 hens.