Walk-In Coop Plan, 8x8 ft
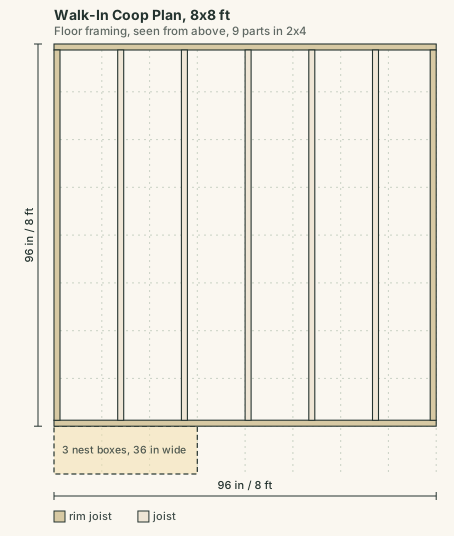
The 8x8 ft Walk-In Coop is the larger of the two walk-in footprints on this site, built for a flock of 6 to 20 hens or a keeper who wants more headroom and floor space to work in.
The footprint stays 8x8 ft regardless of hen count; the roost length, nest box count and ventilation opening scale with your input, following the same Penn State Extension figures used across this site. Enter your hen count and climate at checkout.
The download includes a start-here page with dimensioned front, side and top views, a cut list packed onto stock lumber, a panel layout for the sheathing, a generated assembly order, a bill of materials in JSON, and a floor plan SVG.
If your flock is smaller, the 6x8 ft Walk-In uses less lumber. Check your numbers first on the free Coop Size Planner.
When 8x8 is the right choice
Two situations. A flock heading past a dozen birds, where the extra 16 sq ft is the difference between comfortable and crowded through a long winter. And a keeper who wants working room: feed bins stored inside, a brooder area partitioned off in spring, somewhere to stand with a sick bird that is not the kitchen. At 64 sq ft the coop becomes a small outbuilding with a flock in it.
What scales with hen count
The footprint is fixed; roost length, nest box count and ventilation opening follow the hen count you enter, within the declared 6 to 20 hen range. Roost length is the figure to watch as the flock grows: birds crowded on a short bar will push the lowest ranked hen into the nest boxes at night, and a fouled nest box means dirty eggs every morning.
Partitioning for spring
A walk-in at this size takes a temporary partition well, which is worth planning for even if you do not build it now. Separating a broody hen, integrating new pullets behind wire for a fortnight, or isolating a bird that needs watching are all routine in a flock of this size, and all of them are far easier inside a coop you can stand up in than in a crate in the garage.
Predator proofing is not optional
The most common loss is not a fox through a wall, it is a raccoon through a latch or a weasel through chicken wire. Three details do most of the work: half inch hardware cloth instead of chicken wire on every opening, two step latches that a paw cannot work, and a buried or aproned skirt of hardware cloth extending outward at ground level so nothing digs under the edge. The plans call for hardware cloth throughout for exactly this reason.
Build sequence and working dimensions
Set the coop location before cutting lumber. An 8x8 ft footprint needs a clear work area of about 12x12 ft so you can square walls, move panels, and swing full sheets without stepping into the trench or skirt area. Mark the four outside corners, then compare diagonals. For a square 8x8 ft layout, both diagonals should be about 11 ft 3 13/16 in. If the diagonals differ by more than 1/4 in, adjust the corners before setting the base.
Work in this order: foundation or skids first, floor frame second if used, wall frames third, roof framing fourth, then sheathing, openings, hardware cloth, door hardware, roosts, nests, and interior fixtures. Do not install roosts or nest boxes before the shell is weather tight, because they block access when fastening hardware cloth and trimming openings.
- Keep at least 18 in of clear width at the human door so a feed bag, waterer, or bedding bale can pass without turning sideways.
- Leave 30 to 36 in of standing space inside the door before the first fixed object. This makes daily cleaning easier in wet boots.
- Place roosts higher than nest box entrances, but leave enough head clearance for birds to stand and turn on the bar.
- Use a straightedge across the wall faces before sheathing. A bowed stud can turn into a gap at the hardware cloth edge.
- Precut hardware cloth with 1 to 2 in extra overlap at each framed opening, then trim after fastening if needed.
Tools, materials handling, and checks during assembly
For one person working alone, plan on several short build stages instead of one long push. Wall panels are easier to frame flat on the floor and raise with temporary diagonal braces. If you have a helper, lifting and plumbing the four walls can often be done in one session. Without a helper, use blocking at the wall base and a temporary brace fixed near the top plate before raising the panel.
Useful equipment includes a circular saw, drill and driver, tape measure, framing square, level, clamps, tin snips for hardware cloth, staple gun or screws with washers for mesh, and sawhorses. A chalk line saves time on sheathing cuts. Eye protection and gloves matter when handling hardware cloth, because cut wire ends are sharp and can spring back.
| Check point | Target figure | Why it matters |
|---|---|---|
| Footprint diagonal | About 11 ft 3 13/16 in | Confirms the 8x8 ft base is square before walls go up. |
| Door handling space | 30 to 36 in clear inside | Allows cleaning tools and feed to move without hitting fixtures. |
| Hardware cloth overlap | 1 to 2 in past framing | Gives room for secure fastening and trimming. |
| Fastener spacing on mesh edges | About every 3 to 4 in | Reduces pry points along openings and corners. |
| Temporary brace length | 6 to 8 ft | Holds a wall plumb while adjacent walls are fixed. |
If you are choosing between this size and the smaller walk-in footprint, compare the actual interior work area, not only the bird count. The 6x8 ft walk-in coop saves material, but the 8x8 ft plan gives a wider central zone for storage, isolation pens, or cleaning work.
Common mistakes and practical recovery
A common mistake is fastening the wall sheathing before checking square. If the walls are already sheathed and the top plates do not align, loosen the first few fasteners at one corner, pull the frame into square with a ratchet strap or diagonal brace, then refasten. Do not force the roof framing to hide an out of square wall, because the error will show again at the door and trim.
Another mistake is cutting ventilation openings before deciding where roosts and nests will sit. If an opening lands directly behind the night roost in a cold climate, cover that part from the inside with a framed panel and move the open area higher or to another wall where air can move without blowing across birds at rest.
If the human door rubs after roofing, the frame likely shifted under load. Check the hinge side first. Add a temporary brace to hold the wall plumb, adjust the door frame, then install a permanent diagonal brace or blocking if the wall remains flexible. Do not plane the door until the wall is corrected, unless the frame is already confirmed square.
If water runs toward the coop after the first rain, fix grade before adding birds. Scrape soil so surface water moves away from all four sides. A shallow swale or raised pad is faster than trying to dry wet bedding every week. Keep organic mulch away from the lower wall edge because it holds moisture and gives rodents cover.
Special cases to plan before cutting
For deep winter areas, give priority to dry bedding, controlled high ventilation, and easy access after snow. Place the door where drifting is least likely, even if that changes the approach path from the run. If you use inside water in freezing weather, leave a protected spot close to the door so you can service it without walking through the whole coop.
For hot climates, shade and air movement matter more than stored heat. Keep permanent openings protected with hardware cloth, but avoid blocking crossflow with solid storage bins or a tall brooder wall. A partition used for pullets can be framed with wire above bird height so air still moves through the full 8x8 ft space.
For uneven ground, do not twist the coop to match the soil. Level the supports, then backfill or step the access grade as needed. A twisted base makes doors hard to latch and leaves uneven gaps at predator barriers. If local rules, setbacks, or bird limits are unclear, check them before you build. General planning questions are covered in the FAQ, and other footprints are listed on the plans page.
Read next
- 4-Hen Starter Coop, free plan: Free plan for a small 4-hen coop: full cut list packed onto stock lumber, panel layout, dimensioned views and assembly order, as a downloadable PDF set.
- Your files: Access your purchased Coop Build Plans downloads here.
- Attached Run Add-On Plan: Attached run plan for 2 to 20 hens, framed to join an existing coop.