Walk-In Coop Plan, 6x8 ft
The 6x8 ft Walk-In Coop has a fixed footprint sized for a keeper who wants to stand up inside to clean, collect eggs and check on the flock, rather than reaching into a low box. It covers a hen count range of 4 to 15.
The footprint stays 6x8 ft regardless of hen count; what scales with your input is the roost length, nest box count and ventilation opening, following the same Penn State Extension figures used across this site. Enter your hen count and climate at checkout.
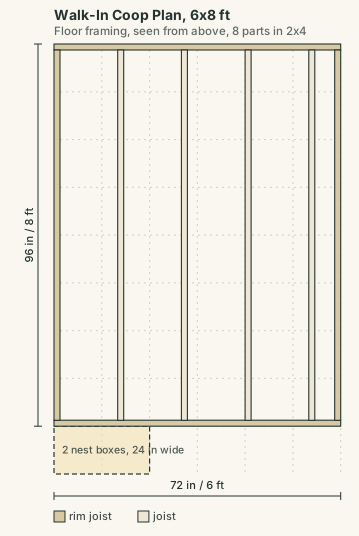
The download includes a start-here page with dimensioned front, side and top views, a cut list packed onto stock lumber, a panel layout for the sheathing, a generated assembly order, a bill of materials in JSON, and a floor plan SVG.
If your flock is closer to 6 to 20 hens, compare the larger 8x8 ft Walk-In. Check your numbers first on the free Coop Size Planner.
Why a walk-in changes the daily routine
Everything that happens in a coop happens more often than you expect: collecting eggs, topping up feed, checking a bird that looks off, cleaning out bedding. Doing that bent double through a low hatch is what makes people stop doing it properly. Standing height turns the coop into a space you maintain rather than one you reach into, and that shows up in flock health long before it shows up anywhere else.
What scales and what does not
The 6x8 ft footprint stays fixed across the declared 4 to 15 hen range: what the engine scales is roost length, nest box count and ventilation opening. That is deliberate, because the useful thing about a walk-in is the standing room, and shrinking the footprint for a small flock would take that away. A smaller flock simply gets more floor per bird, which is never a problem in winter.
Bedding and the floor
At this size, deep litter becomes practical: a thick layer of dry carbon bedding that composts in place, topped up rather than removed, with a full clear out once or twice a year. It needs depth, ventilation above it and a floor that stays dry, which is exactly what a framed walk-in gives you. The alternative, a thin layer scraped out weekly, works too and is more labour.
Predator proofing is not optional
The most common loss is not a fox through a wall, it is a raccoon through a latch or a weasel through chicken wire. Three details do most of the work: half inch hardware cloth instead of chicken wire on every opening, two step latches that a paw cannot work, and a buried or aproned skirt of hardware cloth extending outward at ground level so nothing digs under the edge. The plans call for hardware cloth throughout for exactly this reason.
Site layout and build order
Set out the coop before cutting lumber. Mark a rectangle 72 inches by 96 inches, then check the diagonal. A square 6x8 layout has a diagonal of about 120 inches. If the two diagonals differ by more than 1/4 inch, move the shorter corner until they match. This is faster than correcting a twisted floor later.
Build from the ground upward in fixed stages. First level the supports, then frame and sheath the floor, then raise the wall frames, then set the roof framing, then close the sheathing. Leave trim, door stops, nest access details and hardware cloth fastening until the shell is rigid. A rigid shell lets doors and openings stay square while you fit them.
- Clear at least 24 inches around the footprint so you can carry panels and work a drill without standing in the run area.
- Keep the finished floor high enough that splash water and wet bedding cannot sit against the wall bottom. In most yards, 8 to 12 inches above surrounding grade is a practical target.
- Use a 4 ft level or a straight board with a level on top. A short torpedo level is useful for hardware, but it hides long floor errors.
- Fasten temporary diagonal braces on walls before lifting the next wall. Remove them only after adjacent walls and roof members lock the box together.
- Prime or seal cut edges that will be hard to reach later, especially bottom edges near bedding and rain splash.
Tools, working clearances and field dimensions
A two person crew is not required for every step, but it is strongly recommended when lifting wall sections and roof sheathing. A single person can cut, predrill, fasten hardware cloth and fit trim. Plan one full dry weekend for a careful first build, plus separate time for paint or sealer to cure.
Use the plan dimensions as the controlling dimensions. The figures below are job site checks that help you avoid common layout and handling problems. They are not a substitute for the cut list.
| Item | Practical figure | Why it matters |
|---|---|---|
| Footprint diagonal check | About 120 inches | Confirms the 72 by 96 inch base is square before walls go up. |
| Working space outside walls | 24 to 36 inches | Allows room for clamps, ladders, sheathing and hardware cloth rolls. |
| Maximum floor level error to correct early | 1/4 inch over 8 ft | Larger errors show up as tight doors, uneven roof lines and twisted siding. |
| Hardware cloth overlap at seams | At least 2 inches | Prevents a pulled edge from opening a gap at corners and vents. |
| Door reveal target | 1/8 to 3/16 inch per side | Leaves room for paint and seasonal swelling without creating a large gap. |
Useful tools include a circular saw, drill and driver, framing square, speed square, chalk line, tape measure, clamps, tin snips, staple gun or screw mounted washers for mesh, gloves and eye protection. A flat assembly surface matters as much as the saw. If the driveway is the flattest surface, cut there and move parts to the coop site after marking them.
Frequent mistakes and recovery steps
The most expensive mistakes usually happen before the coop looks like a coop. A base that is out of square, a wet low spot, or a wall lifted without bracing can add hours of repair. Stop when the error is found. Do not keep building to see if the next part hides it.
If the floor frame is out of square, loosen the corner fasteners enough to move the frame, pull the long diagonal shorter with a clamp or ratchet strap, then refasten after both diagonals match. If sheathing is already installed, check whether the sheet edges are forcing the frame crooked. It is often faster to remove one sheet than to plane every door later.
If the site becomes muddy after rain, do not solve it with loose bedding inside the coop. Redirect surface water outside first. Add compacted gravel, raise the support points, or cut a shallow swale so water moves around the structure instead of under it. Bedding is for manure control, not drainage repair.
If a door rubs after paint, first check the hinge screws and the frame square. If the frame is still square, plane or sand the tight edge and reseal the bare wood. If the frame has moved, add a diagonal brace or correct the support below before trimming the door too much.
If hardware cloth bulges between fasteners, add more fasteners rather than pulling harder at one corner. Mesh that is stretched like fabric can tear at staples. Flat, evenly fastened mesh is stronger than tight mesh with stressed corners.
Special cases to plan before cutting
Cold sites need dry air movement above bird level, not sealed walls. Leave the designed openings clear, keep bedding dry, and block drafts only where air blows directly across roost height. In hot sites, shade on the west and south sides can reduce afternoon heat more than adding extra openings after the build.
For sloped ground, step the supports rather than burying one side of the floor frame. Wood held against soil stays wet. If the grade drop across 8 ft is more than about 8 inches, consider leveling a pad first or using taller supports on the low side with solid bracing.
For very wet soils, put the coop where you can still reach it in winter with a wheelbarrow. A perfect coop placed beyond a muddy crossing becomes hard to maintain. If access is tight, compare the larger layout only if your site can spare the handling room around it, not just the footprint. See the 8x8 walk in plan for the larger footprint, and use the FAQ for general build questions before ordering materials.
Read next
- A-Frame Chicken Tractor Plan: A-frame chicken tractor plan for 2 to 6 hens, no fixed foundation, attached run underneath.
- Raised Coop + Run Bundle: Raised coop and attached run bundled in one cut list, for 2 to 8 hens.
- Raised Coop Plan: Raised chicken coop plan for 2 to 8 hens with outdoor-access nest box and roost.