A-Frame Chicken Tractor Plan
The A-Frame Tractor is a movable coop and run in one structure, with no fixed foundation, sized for 2 to 6 hens. It is built to be dragged or wheeled to fresh ground rather than set once and left.
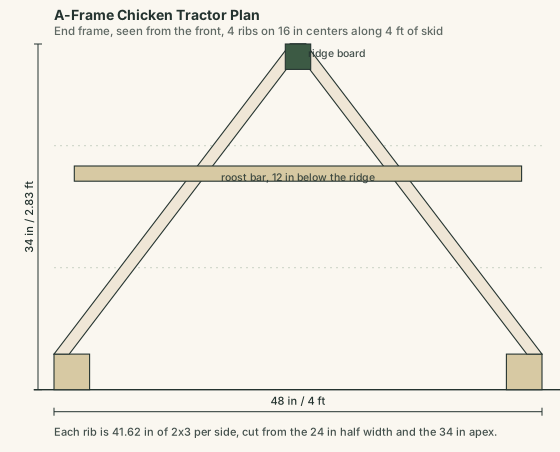
Because the frame is a triangular A-shape rather than a rectangular box, the dimensioned views in this plan draw the front and side as the actual triangle, not a rectangle standing in for it. Enter your hen count and climate at checkout to scale the roost length, nest box count and ventilation opening.
The download includes a start-here page, a cut list packed onto stock lumber lengths, a panel layout for the sheathing, a generated assembly order, a bill of materials in JSON, and a floor plan SVG.
This plan has not been physically built or field-tested as part of making it; the geometry and material quantities are computed from the framing rules described on the Coop Size Planner page. Need hardware cloth and fasteners? See materials.
What a tractor is for
A movable coop keeps the flock on fresh grass and spreads the manure across the ground instead of concentrating it in one run. Moved every day or two, a small flock fertilises a lawn or a cleared bed rather than stripping one patch bare. It is the right answer for a small flock on decent ground and the wrong answer for a large flock or for heavy clay that churns.
Weight is the design constraint
Every design decision in a tractor trades strength against what one person can actually drag. The A-frame shape is used because it braces itself: the two sloped sides act as both wall and roof, so the structure resists racking without heavy corner posts. Keep the sheet goods to what the plan calls for, and resist adding a solid floor, which doubles the weight and defeats the point of moving it onto grass.
Moving it without losing birds
- Move in the morning while the flock is awake and alert rather than at dusk
- Lift the trailing edge rather than dragging it flat, so nobody gets caught underneath
- Choose ground level enough that the frame sits down flush: a gap at the edge is a predator door
- Plan the route so the tractor never has to cross a step or a raised path
Build order and on-site setup
Set out a flat assembly area at least 2 ft wider and 2 ft longer than the tractor footprint. A garage floor, a sheet of plywood on sawhorses, or a paved pad is better than grass, because the two triangular end frames must match. If one end frame is 1/2 in out of square at the bottom, the ridge line will twist and the side panels will not sit flat.
Cut the paired rafters together when possible. Mark each pair with the same reference face before cutting the angle. Build the first triangular end frame, measure its base width, ridge height, and diagonal distances, then use it as the pattern for the second end frame. Clamp the second frame directly over the first while fastening, with scrap blocks between them only where screw heads would interfere.
Join the two end frames with the ridge member first, then install the bottom side rails. Do not fully tighten every fastener until all four long members are in place and the frame sits without rocking. Measure both diagonals along the long side. A difference under 1/4 in is usually workable for a small movable coop. A difference over 1/2 in should be corrected before panels or wire are fitted.
- Use two sawhorses for cutting, two clamps per joint when assembling frames, and a long straightedge to check the ridge.
- Pre-drill near the ends of narrow boards. A pilot hole about 70 percent of screw shank diameter reduces splitting.
- Staple or screw wire from the center outward. Pulling from one corner first often leaves a diagonal wrinkle that is hard to remove.
- Fit doors and lids before final wire trimming, so the moving parts can be adjusted without sharp edges in the way.
Working dimensions and clearance checks
Before fastening any fixed perch, door, or nest access panel, check the real clearances on the built frame, not only the drawing. Lumber thickness, saw angle, and hardware choice can change the useful space by 1/4 in to 3/4 in. That is enough to make a latch bind or a perch sit too close to the sloped side.
| Check point | Practical figure | Why it matters |
|---|---|---|
| Ground contact gap | Under 1 in along each long side | Larger gaps admit rats, weasels, or a bird pushing out under panic. |
| Door swing clearance | At least 1/2 in beyond the latch and trim | Grass, bedding, and frame flex can stop a tight door from closing. |
| Roost clearance from sloped wall | About 8 in to 12 in at bird height | Birds need space for tail and body width without rubbing the wire or sheathing. |
| Hand access opening | At least 10 in wide for cleaning reach | A smaller opening makes wet bedding and stuck eggs hard to remove. |
| Daily move distance | One full tractor length on short grass | This puts birds on clean ground while keeping the old manure strip outside the footprint. |
On slopes, measure the low side gap after the tractor is parked, not while it is lifted. If the frame leaves a wedge-shaped opening, fill the hollow with soil, set a temporary board along the outside, or choose a flatter track. A movable coop depends on full edge contact more than a fixed coop does.
Frequent mistakes and recovery steps
If the tractor is too heavy to move, remove added nonstructural weight first. Common causes are extra sheet goods, thick interior partitions, oversized hardware, and stored feed inside the coop. Do not solve the problem by dragging faster. Fast dragging bends bottom rails, tears grass, and can trap feet under the rear edge. If the ground is rough, add a removable handle or use wheels only during movement, then set the frame back down tight to the soil.
If a triangular end frame racks during assembly, loosen the long side fasteners, pull the longer diagonal inward with a clamp or temporary strap, then refasten. Do this before installing sheathing or wire. Once panels are installed, the frame becomes much harder to correct and the door openings may stay out of square.
If wire sags between framing members, add a narrow batten over the wire and fasten through both layers into the frame. Do not rely on staples alone where predators can pull. For edges close to the ground, sandwiching the wire between wood and frame gives better resistance to peeling than surface fastening.
If hens refuse the roost, check height, grip, and crowding before changing the whole layout. A perch that is too close to the sloped side feels cramped. A perch that twists under weight feels unsafe. A simple test is to press down at the midpoint with about 10 lb of force. If it rolls or flexes visibly, add blocking or shorten the unsupported span.
Special cases to plan before cutting
For hot climates, prioritize shaded parking locations and high vent openings that do not face prevailing rain. Moving the tractor under a tree can lower surface temperature far more than adding material to the roof. For cold climates, block direct wind at roost height while keeping an upper air path open. Moisture from breathing and manure must leave the structure even when the birds need shelter.
For chicks, bantams, or small pullets, reduce escape gaps and keep the first week of use on very even ground. Small birds find openings that adult hens ignore. For large breeds, verify body clearance at the roost and nest access before final fastening. More floor length does not help if the triangular sides crowd the usable shoulder space.
If you are comparing this movable layout with a fixed coop, review the broader plan options at chicken coop plans. For sizing questions that affect bird count, ventilation, and daily care, use the reference answers in the coop building FAQ.
Read next
- Terms of sale: Terms of sale for coopbuildplans.com: what a purchase includes, digital delivery, resizing within range, refund conditions, and plan usage rights.
- Walk-In Coop Plan, 6x8 ft: Walk-in chicken coop plan, 6x8 ft footprint, for 4 to 15 hens.
- About Coop Build Plans: Coop Build Plans, built and run by WEABLE SAS.