
Attached Run Add-On Plan
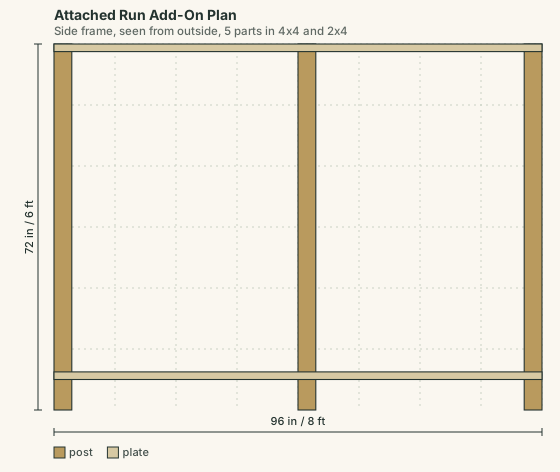
The Run Add-On is a hardware-cloth run framed to attach to an existing coop wall, sized for 2 to 20 hens and a run length you choose in 2 ft steps at checkout.
The download includes post spacing, a hardware cloth cut list based on standard 48 in roll width, a framed door, and a generated assembly order for attaching the run to your coop. It is a simpler structure than a full coop, so its assembly order is shorter: posts, hardware cloth, then the door.
This plan pairs with any coop on this site, and is included pre-combined with the Raised Coop in the Raised Coop + Run Bundle for less than buying both separately. Check your outdoor run space needs first on the free Coop Size Planner.
Attaching to an existing coop
The run frames against one wall of a coop you already have, which means the attachment detail matters more than the run itself. The plan sets post spacing, frames a door you can actually walk through, and cuts the hardware cloth from standard 48 in roll width so the seams land on framing rather than in mid air. Seams overlapped and fastened on a stud are what keeps a determined raccoon out.
Roof or no roof
An open topped run is cheaper and lighter, and it is an open invitation to hawks and to climbing predators. Covering at least part of the run also gives the flock somewhere dry to stand on a wet day, which keeps them out of the coop and keeps the coop drier. If you cover none of it, expect to lose birds to raptors in open country.
Predator proofing is not optional
The most common loss is not a fox through a wall, it is a raccoon through a latch or a weasel through chicken wire. Three details do most of the work: half inch hardware cloth instead of chicken wire on every opening, two step latches that a paw cannot work, and a buried or aproned skirt of hardware cloth extending outward at ground level so nothing digs under the edge. The plans call for hardware cloth throughout for exactly this reason.
Choosing a run length
Run length is picked in 2 ft steps at checkout, for 2 to 20 hens. Size it on outdoor space per bird rather than on what fits the lawn: hens confined to a tight run strip the ground bare within weeks, and bare ground turns to mud, which is where most flock health problems start. If the space is fixed, plan to move the flock to fresh ground or to deep litter the run.
Set out the run before you dig
Start by marking the coop wall line and the outside run line with string. Check the two diagonals of the marked rectangle before setting any post. If the diagonals differ by more than 1 in on a small run, the door frame and cloth edges will fight you later. Correct the string layout first, not after the posts are in the ground.
Measure from the finished coop wall, not from trim, siding bumps, or roof overhangs. The run frame needs a flat fastening surface. If the coop wall has lap siding, add a flat vertical ledger or blocking strip where the run frame will land. Use a level to mark the top and bottom of that fastening line so the run does not twist against the coop.
- Clear the ground at least 12 in wider than the planned run on all sides so you have room to staple, fasten, and tension the cloth.
- Keep the bottom rail 1 in to 2 in above soil if the site drains poorly, then close the gap with the ground apron, not with loose soil.
- Allow at least 30 in of clear swing space outside the door so a feed bucket or bedding fork can pass through.
- Plan the door on the side with the shortest walk from feed storage, not on the side that only looks neat from the yard.
Before cutting any cloth, unroll it flat for several hours or pin it down with scrap lumber. A 48 in roll stores tension. If you cut it while curled, your edges wander and the overlap at the frame becomes too small.
Tools, fasteners, and working dimensions
The exact lumber schedule comes from the selected plan length, but the working tolerances on site are the same for most builds. Treat the numbers below as field targets when you prepare the area and check your work. For plan selection beside the run add-on, use the plans page.
| Item | Practical figure | Why it matters |
|---|---|---|
| Post hole depth | 24 in to 36 in, adjusted for frost and soil | Shallow posts loosen when the door is used daily. |
| Hardware cloth overlap at seams | At least 2 in on framing | A narrow overlap opens when pulled by a predator or by weather movement. |
| Staple or screw spacing on cloth edges | About 3 in to 4 in apart on exposed edges | Wide spacing leaves pry points along the bottom and corners. |
| Door clearance | About 1/8 in to 3/16 in on each side | Less clearance rubs after swelling, more clearance weakens latch alignment. |
| Ground apron width | 12 in minimum, 18 in to 24 in in soft soil | Most digging starts at the wall and stops when it hits cloth. |
Use a tape measure, string line, level, post hole digger, square, tin snips, drill or driver, hammer, and heavy gloves. Hardware cloth cuts are sharp enough to open skin through light garden gloves. Eye protection is useful when trimming short wire ends because clipped pieces spring sideways.
Build sequence and recovery from common errors
Set the coop-side frame line first, then the outside post line. Brace posts temporarily before fastening rails. Once the rails are straight, attach the cloth from one end toward the other, pulling it tight by hand or with a scrap board clamped across the cloth. Fasten the middle first, then work toward the corners so waves do not collect at one end.
If the run is out of square, do not force the door to match the crooked opening. Shim or reframe the opening square inside the run frame. A square door in a crooked opening still latches. A crooked door usually sags within weeks.
If the hardware cloth seam lands between posts, add a vertical nailer or blocking strip behind the seam. Do not rely on wire ties alone in the open span. Wire ties are useful for holding shape while you work, but the finished seam should be backed by wood where pressure is expected.
If water runs through the run, cut a shallow diversion swale uphill rather than raising the run on loose fill. A run built on fresh fill settles unevenly. A 2 in drop across a door opening is enough to make the latch miss after a wet season.
If the latch no longer lines up, check the hinge post first. Tighten hinge screws, add blocking behind the hinge side if needed, then adjust the latch. Moving the latch repeatedly without fixing the moving post only makes the gap larger.
Special cases: slopes, existing coops, and mixed flocks
On a slope, step the bottom rail with the ground instead of leaving a long triangular gap. Fill each step with framed cloth, and continue the ground apron along the slope. Where the apron turns a corner, overlap the two pieces by at least 6 in and fasten both to the same corner framing.
For an older coop, inspect the wall before attaching the run. Soft siding, loose trim, or thin sheathing is not a structural anchor. Fasten into studs, posts, or added blocking. If you cannot identify framing from the outside, check from inside the coop before drilling.
For bantams or young birds, look closely at the door bottom, wall joint, and any roof transition. Small birds find gaps that full size hens ignore. For large breeds, protect the ground surface before it becomes bare. Wood chips 4 in to 6 in deep are a practical starting layer in a fixed run, then add more when mud appears.
For snowy areas, avoid creating a cloth roof panel that carries wet snow unless the framing is sized for that load. If you need covered space, a solid sloped cover over part of the run is easier to clear and gives birds a dry standing area. For general sizing questions before you choose a length, see the FAQ.
Read next
- A-Frame Chicken Tractor Plan: A-frame chicken tractor plan for 2 to 6 hens, no fixed foundation, attached run underneath.
- About Coop Build Plans: Coop Build Plans, built and run by WEABLE SAS.
- Your files: Access your purchased Coop Build Plans downloads here.